You can make your own set of 'jams...
Or Pajamas, pyjamas, PJs. The point is one of the stereotypical items on a nice set of top and bottom pajamas is the buttons and button holes.
(Can you really imagine the Bananas in Pajamas in a t-shirt and shorts? Exactly!)
If I must be formal the title of this post is: "Buttonholers for the Kenmore family Sewing Machines from the 60's and 70's."
Much like the Monogrammer post previously, there are a few different style of buttonholers that came out with these eras of machines. Infact, there is a near identical trend with these gadgets. A matter of difference is that these gadgets don't ever get to use a hoop like the monogrammers.
In general there are two styles of buttonholers in this era: bed specific, and shank specific. (Sound familiar??)

The shank specific buttonholers of this era harken back to the buttonholers of the early straight stitch 117s, and the zig-zag 158s. They attach to the presser foot bar, and have an advancement mechanism that reaches out to the needle bar. As the needle goes up and down, the gadget moves the fabric accordingly. These slightly more modern ones, though, do use the drop feed function, rather than having to put on a darning plate. It controls the fabric from the TOP.
I have seen these in both low shank, and high shank. They have little cams that have teeth cut out inside. You open the body of the buttonholer, and place the cam in over a gear, making sure to align the teeth of the cam with the teeth of the gear, and in the starting position.
Adjust your sewing machine to a zig-zag stitch of a reasonable width (1 or 2 is the most common setting I have seen). Then place your fabric UNDER the whole unit and let its "foot" do the advancing of the material. (I usually decrease the tension on the upper thread a little bit, as I prefer a slightly flatter back to my buttonhole. Which is the bobbin thread pulling the top thread in the fabric a bit more. I probably made some avid sewers cringe)
And run the stitches and like that, you have yourself a button hole.
Now the bed specific ones, they are interesting. They take over the job of your feed dogs entirely from the BOTTOM. So drop those dogs! And they won't likely work well with a darning plate under, sorry.
This is when I like to reiterate the branding theme. Just like the monogrammers, when you install the buttonholer, it should be right side up reading to you. "Kenmore" or "Sears" should look right side up. That's key number one to having the right family of buttonholer for your machine.
These will eventually set into the bed of your machine. There will be a screw hole either in front or behind your needle plate, sort of centered with your needle arm. The vast majority of these buttonholers will fasten to the back. There are only a handful of machines mostly the 198x models that will be from the front.
My experience thus far, is that almost ALL buttonholers with the branding in the right direction will fit on those machines. ONE notable exception I learned, at some point Kenmore had different sizes for the screw holes into the bed. So check out for that.
The buttonholers have the same over all mechanism, just different ways of delivering it.
There will be an arm (the buttonholer attachment itself) with an oblong hole in it, and some raised triangles around the hole. At one end of that arm, there is a place for the cam, and the other the screw in another oblong hole that you screw down into the bed.
Exactly same process between all of these types.
The cams will be a little different though. You'll have single metal cams where you slide a shape in with the label popping through the hole (10 patterns in all). Buttonholer arms with the cams built into a cam wheel (5 to 10 patterns based upon wheel size), and you just rotate the wheel for the selection of the cam. And then linear selecting cams. Where there is a cam card with 4 to 5 cams in it, and you just advance left/right until you find the shape you are looking for. There are 5 cam cards I have seen, for a total of 22 pattern to select from.
The buttonholers overall will then also have a bed replacement part. Sometimes it'll be replacing the throat plate with a plate with an arm on the bottom, and a gear on top, sometimes it'll be replacing the lid to your free arm attachment, and making sure you put in the plate with an arm on the bottom and gear on top.
Just like in the monogrammers though, there is something to keep in mind. There are plates with notches and plates that are straight across. The plates with notches fit with the machine that has a notch in the throat plate.
Unlike the monogrammers though, there is a plate at 1 1/4 inch for early models and for "lower" models, like the 158.54x, and the 158.1601x. And 1 1/8 for the high end and/or more modern models such as the 158.1802, and 158.1814. Just make sure you have the right plate.
After installing the bed replacement, choosing your pattern, screwing down the arm, the last thing to do is aligning the gear on the bed to the teeth in the cam with the screw in the back closest to the S[tsart] written on the arm. Adjust for the stitch width, length, and pressure appropriately, place the fabric between the foot and this arm, and start! Either use the satin stitch foot, or a wide button hole foot that is much like what is used with the monogrammer. Using the standard sliding buttonholing foot just doesn't seem to work.
It sounds like a more complex process than the ones that connect to the presser bar, and I guess it is. But I have found that even in comparison to my modern machines with built in control for the buttonholes I really like the bed replacement buttonholes.
When I use the bed replacement buttonholes, if I'm not entirely confident on the fabric I can put my fingers around the fabric holding it either to the bed, or to the arm. The gear is strong enough that the fabric WILL move according to the buttonholer. So my stabilizing is helpful, not harmful. One of the other things I like about them is the ease to move it out of the way. Pull it up off the gear, and swing it around to the back of the machine. If you need to switch buttonholes you can do that too by lifting it up off the gear (but leaving it screwed down), and changing the cam appropriately either from the back of the machine or the side (I like the left side).
They do a wonderful job. I absolutely adore the button holes that I get from this. They actually make curves around things, and the button holes can be far wider than the actual width that the machine is capable. I'm not limited to a buttonhole that's only 7mm wide in total. Because the arm is what is controlling the position of the stitch, not the needle position alone like modern machines, I can make fairly large holes, or use the holer to outline another hole with another color. it is a nice feature for extra design detail. I have yet to use it with a double needle, but I imagine that would be nice as well.
Seriously these buttonholes are stunning; to me the person used to the 3/4 step button holes.
I'm curious how the combination of buttonholer and chainstitcher will be when I get there.
Or Pajamas, pyjamas, PJs. The point is one of the stereotypical items on a nice set of top and bottom pajamas is the buttons and button holes.
(Can you really imagine the Bananas in Pajamas in a t-shirt and shorts? Exactly!)
If I must be formal the title of this post is: "Buttonholers for the Kenmore family Sewing Machines from the 60's and 70's."
Much like the Monogrammer post previously, there are a few different style of buttonholers that came out with these eras of machines. Infact, there is a near identical trend with these gadgets. A matter of difference is that these gadgets don't ever get to use a hoop like the monogrammers.
In general there are two styles of buttonholers in this era: bed specific, and shank specific. (Sound familiar??)
The shank specific buttonholers of this era harken back to the buttonholers of the early straight stitch 117s, and the zig-zag 158s. They attach to the presser foot bar, and have an advancement mechanism that reaches out to the needle bar. As the needle goes up and down, the gadget moves the fabric accordingly. These slightly more modern ones, though, do use the drop feed function, rather than having to put on a darning plate. It controls the fabric from the TOP.
 |
| Low Shank button holer |
I have seen these in both low shank, and high shank. They have little cams that have teeth cut out inside. You open the body of the buttonholer, and place the cam in over a gear, making sure to align the teeth of the cam with the teeth of the gear, and in the starting position.
Adjust your sewing machine to a zig-zag stitch of a reasonable width (1 or 2 is the most common setting I have seen). Then place your fabric UNDER the whole unit and let its "foot" do the advancing of the material. (I usually decrease the tension on the upper thread a little bit, as I prefer a slightly flatter back to my buttonhole. Which is the bobbin thread pulling the top thread in the fabric a bit more. I probably made some avid sewers cringe)
And run the stitches and like that, you have yourself a button hole.
Now the bed specific ones, they are interesting. They take over the job of your feed dogs entirely from the BOTTOM. So drop those dogs! And they won't likely work well with a darning plate under, sorry.
This is when I like to reiterate the branding theme. Just like the monogrammers, when you install the buttonholer, it should be right side up reading to you. "Kenmore" or "Sears" should look right side up. That's key number one to having the right family of buttonholer for your machine.
These will eventually set into the bed of your machine. There will be a screw hole either in front or behind your needle plate, sort of centered with your needle arm. The vast majority of these buttonholers will fasten to the back. There are only a handful of machines mostly the 198x models that will be from the front.
My experience thus far, is that almost ALL buttonholers with the branding in the right direction will fit on those machines. ONE notable exception I learned, at some point Kenmore had different sizes for the screw holes into the bed. So check out for that.
 |
| Left: 1802 multi cam wheel, smaller screw Right: Unknown, multi cam wheel, larger screw |
 |
| May be able to see the size difference better here |
The buttonholers have the same over all mechanism, just different ways of delivering it.
There will be an arm (the buttonholer attachment itself) with an oblong hole in it, and some raised triangles around the hole. At one end of that arm, there is a place for the cam, and the other the screw in another oblong hole that you screw down into the bed.
Exactly same process between all of these types.
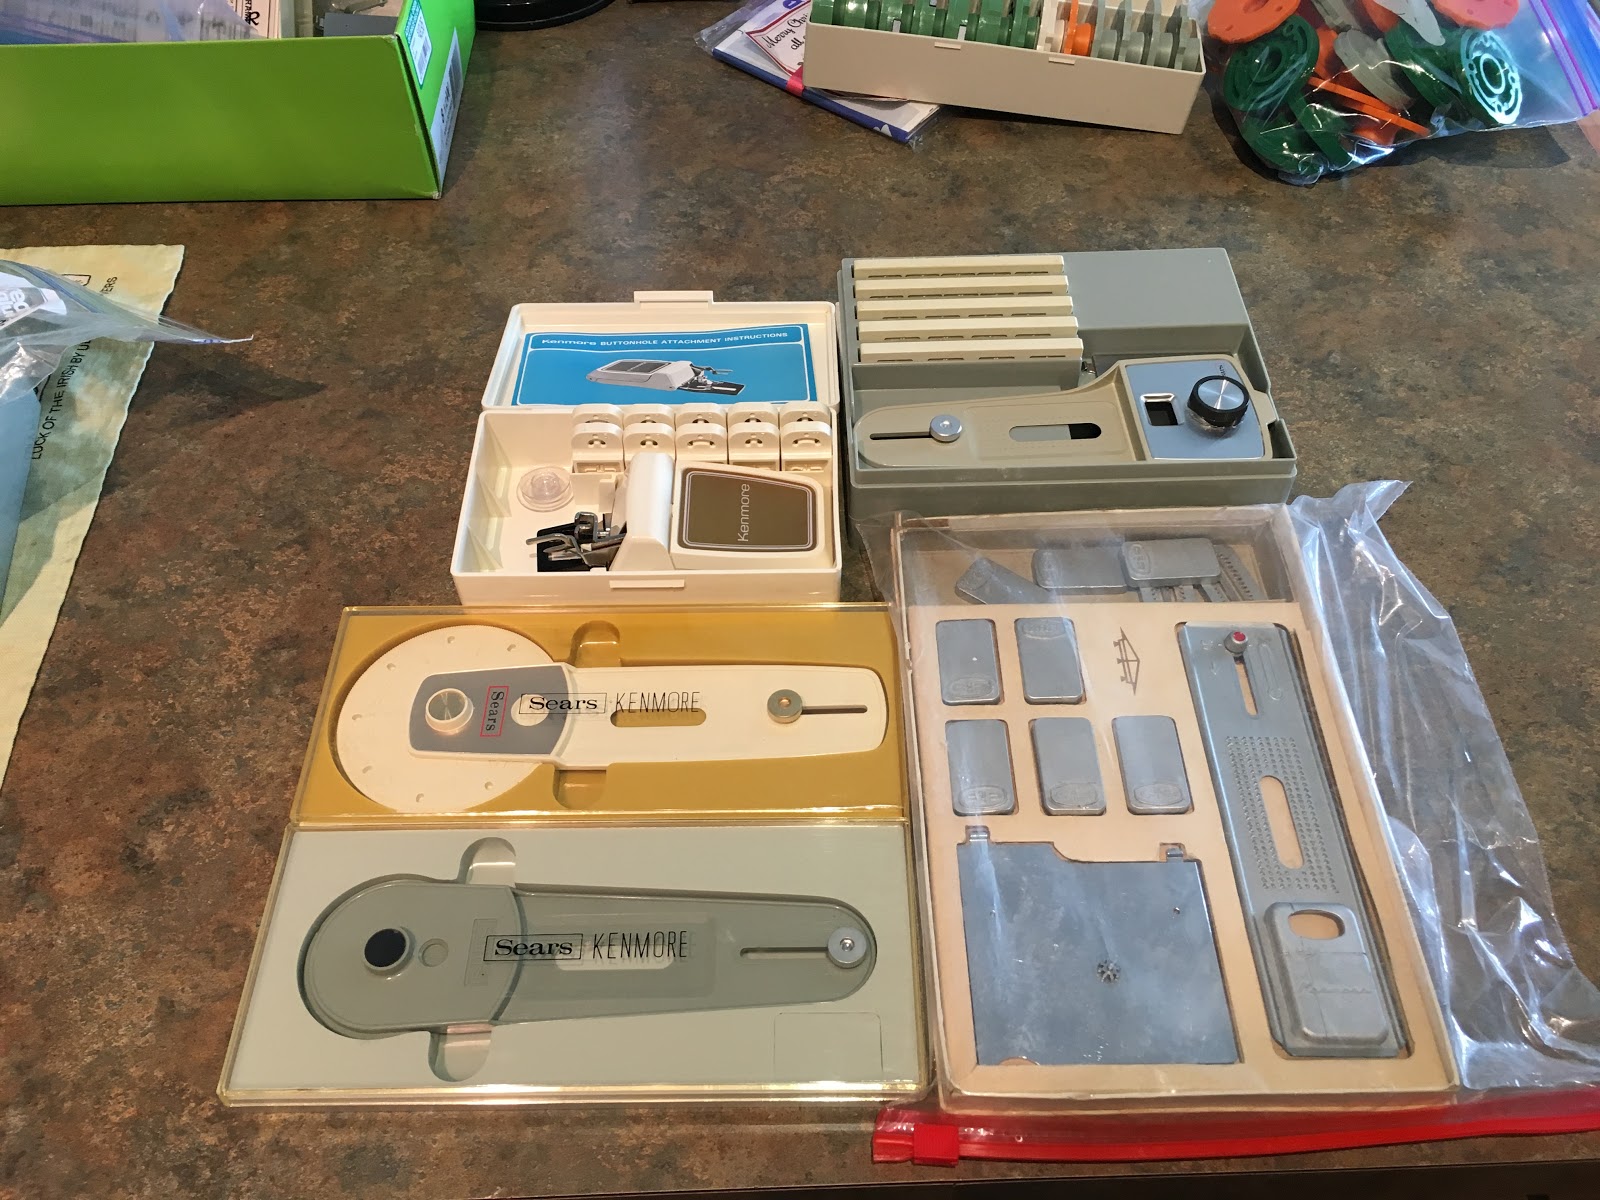
The cams will be a little different though. You'll have single metal cams where you slide a shape in with the label popping through the hole (10 patterns in all). Buttonholer arms with the cams built into a cam wheel (5 to 10 patterns based upon wheel size), and you just rotate the wheel for the selection of the cam. And then linear selecting cams. Where there is a cam card with 4 to 5 cams in it, and you just advance left/right until you find the shape you are looking for. There are 5 cam cards I have seen, for a total of 22 pattern to select from.
The buttonholers overall will then also have a bed replacement part. Sometimes it'll be replacing the throat plate with a plate with an arm on the bottom, and a gear on top, sometimes it'll be replacing the lid to your free arm attachment, and making sure you put in the plate with an arm on the bottom and gear on top.
 |
| Replaced the plate with the buttonhole gear plate |
Just like in the monogrammers though, there is something to keep in mind. There are plates with notches and plates that are straight across. The plates with notches fit with the machine that has a notch in the throat plate.
Unlike the monogrammers though, there is a plate at 1 1/4 inch for early models and for "lower" models, like the 158.54x, and the 158.1601x. And 1 1/8 for the high end and/or more modern models such as the 158.1802, and 158.1814. Just make sure you have the right plate.
After installing the bed replacement, choosing your pattern, screwing down the arm, the last thing to do is aligning the gear on the bed to the teeth in the cam with the screw in the back closest to the S[tsart] written on the arm. Adjust for the stitch width, length, and pressure appropriately, place the fabric between the foot and this arm, and start! Either use the satin stitch foot, or a wide button hole foot that is much like what is used with the monogrammer. Using the standard sliding buttonholing foot just doesn't seem to work.
 |
| Buttonholer not yet screwed on with satin stitch foot |
It sounds like a more complex process than the ones that connect to the presser bar, and I guess it is. But I have found that even in comparison to my modern machines with built in control for the buttonholes I really like the bed replacement buttonholes.
When I use the bed replacement buttonholes, if I'm not entirely confident on the fabric I can put my fingers around the fabric holding it either to the bed, or to the arm. The gear is strong enough that the fabric WILL move according to the buttonholer. So my stabilizing is helpful, not harmful. One of the other things I like about them is the ease to move it out of the way. Pull it up off the gear, and swing it around to the back of the machine. If you need to switch buttonholes you can do that too by lifting it up off the gear (but leaving it screwed down), and changing the cam appropriately either from the back of the machine or the side (I like the left side).
They do a wonderful job. I absolutely adore the button holes that I get from this. They actually make curves around things, and the button holes can be far wider than the actual width that the machine is capable. I'm not limited to a buttonhole that's only 7mm wide in total. Because the arm is what is controlling the position of the stitch, not the needle position alone like modern machines, I can make fairly large holes, or use the holer to outline another hole with another color. it is a nice feature for extra design detail. I have yet to use it with a double needle, but I imagine that would be nice as well.
Seriously these buttonholes are stunning; to me the person used to the 3/4 step button holes.
I'm curious how the combination of buttonholer and chainstitcher will be when I get there.
Comments
Post a Comment